Using the OpenFileDialog box wasn’t as intuitive as I initially expected, I was thinking I could just drag it out onto my form as a button and place it right where I wanted to. But when I clicked on it from toolbox it just went into the bottom frame of my application, but not on my form like I was hoping for. Below I is an example of a dynamically (aka created at run) created OpenFileDialog. Because it’s dynamically created when don’t have to drag it out to form, it’s created by the code, not from the GUI.
In this example, I put the OpenFileDialog in a function and not a subroutine. The reason for this is that I want to return a value. Functions allow you to return a value whereas a subroutine does not.
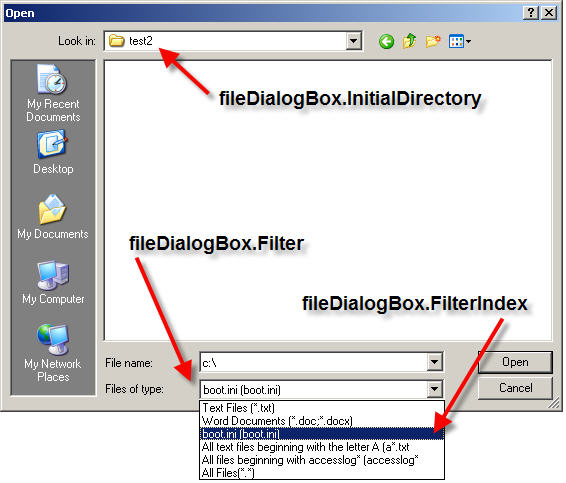
Let’s take a look at this screen shot, there are 3 main elements that we can set which I’ll describe in further detail. They are the initial directory, filter, and filter index.

OpenFileDialog
Initial Directory – I guess the easiest one to explain in the initial directory, when you open the dialog box you’ll typically want it to open to a particular folder, in most cases I would guess this to be the user’s My Documents folder.
fileDialogBox.InitialDirectory = Environment.GetFolderPath(Environment.SpecialFolder.Personal) |
The above line does just that, we query the .NET class Environment to get the locations of the users My Documents folder. But now what if we wanted it to open up in the C:\Program Files folder? Simple enough…
fileDialogBox.InitialDirectory = "C:\Program Files" |
Filter – This allows us to filter the filetypes/filenames that we want to see in the OpenFileDialog. For example, if I want to only see *.txt I can create a text filter by assigning fileDialogBox.Filter = Text Files (*.txt)|*.txt| and literally we just repeat this pattern to add more file types. Here’s a few more examples.
1 2 3 4 5 6 | fileDialogBox.Filter = "Text Files (*.txt)|*.text|" _ & "Word Documents (*.doc;*.docx)|*.doc;*.docx|" _ & "boot.ini (boot.ini)|boot.ini|" _ & "All text files beginning with the letter A (a*.txt)|a*.txt|" _ & "All files beginning with accesslog* (accesslog*)|accesslog*|" _ & "All Files(*.*)|" |
Filter Index – To default to a particular filter you will need to select a filter index. In this example you’ll notice that I have boot.ini selected. We can do that by looking at the above piece of code and noticing that boot.ini comes 3rd in that list.
fileDialogBox.FilterIndex = 3 |
That’s it, this allows us to keep our filters arranged alphabetically and still be able to select an item from the middle of the list.
The Code – Here it is. In the function OpenFile() it will return a string with the filename and path as a string. If no filename is selected, a blank string is returned. In the subroutine btnOpenFile_Click if we do have a file then I’ll just retrieve some of the file info and display it on a message box otherwise I’ll tell the user that they did not select a file.
1 2 3 4 5 6 7 8 9 10 11 12 13 14 15 16 17 18 19 20 21 22 23 24 25 26 27 28 29 30 31 32 33 34 35 36 37 38 39 40 41 42 43 44 45 46 47 48 49 50 51 52 53 54 55 56 57 58 | 'This code was developed by Gerardo Lopez and was downloaded from www.brangle.com 'Complete source code is available at: 'http://www.brangle.com/wordpress/2009/09/howto-use-the-openfiledialog-box-in-vbnet/ 'This was declared as a function because I want to be able to return a filename 'the filename will be returned as a string Public Function OpenFile() As String 'declare a string, this is will contain the filename that we return Dim strFileName = "" 'declare a new open file dialog Dim fileDialogBox As New OpenFileDialog() 'add file filters, this step is optional, but if you notice the screenshot 'above it does not look clean if you leave it off, I explained in further 'detail on my site how to add/modify these values fileDialogBox.Filter = "Rich Text Format (*.rtf)|*.rtf|" _ & "Text Files (*.txt)|*.txt|" _ & "Word Documents (*.doc;*.docx)|*.doc;*.docx|" _ & "Image Files (*.bmp;*.jpg;*.gif)|*.bmp;*.jpg;*.gif|" _ & "All Files(*.*)|" 'this sets the default filter that we created in the line above, if you don't 'set a FilterIndex it will automatically default to 1 fileDialogBox.FilterIndex = 3 'this line tells the file dialog box what folder it should start off in first 'I selected the users my document folder fileDialogBox.InitialDirectory = Environment.GetFolderPath(Environment.SpecialFolder.Personal) 'Check to see if the user clicked the open button If (fileDialogBox.ShowDialog() = DialogResult.OK) Then strFileName = fileDialogBox.FileName 'Else ' MsgBox("You did not select a file!") End If 'return the name of the file Return strFileName End Function Private Sub btnOpenFile_Click(ByVal sender As System.Object, ByVal e As System.EventArgs) Handles btnOpenFile.Click 'declare a string to the filename Dim strFileNameAndPath As String = OpenFile() 'check to see if they selected a file or just clicked cancel If (strFileNameAndPath = "") Then 'Chastise the user for not selecting a file :) MsgBox("You did not select a file!") Else 'Begin doing whatever it is you would normally do with the file! MsgBox("You selected this file: " & strFileNameAndPath & vbCrLf & _ "The filename is: " & System.IO.Path.GetFileName(strFileNameAndPath) & vbCrLf & _ "Located in: " & System.IO.Path.GetDirectoryName(strFileNameAndPath) & vbCrLf & _ "It has the following extension: " & System.IO.Path.GetExtension(strFileNameAndPath) & vbCrLf & _ "The file was created on " & System.IO.File.GetCreationTime(strFileNameAndPath) & vbCrLf & _ "The file was last written to on " & System.IO.File.GetLastWriteTime(strFileNameAndPath) _ ) End If End Sub |